This post about receiving Bluetooth broadcast intents, written for a series about creating a Bluetooth home screen widget, seemed worthwhile standalone, so here it is, in three steps.
Step 1. Create a BroadcastReceiver to receive Bluetooth events
Create a class that extends
BroadcastReceiver. Android Studio has a wizard that will do this for you. Right-click on the path where you want the file created in the Project pane. Select
New > Other > Broadcast Receiver. In the wizard, name the class (here named
BluetoothReceiver for our widget project) and Android Studio will create this for you:
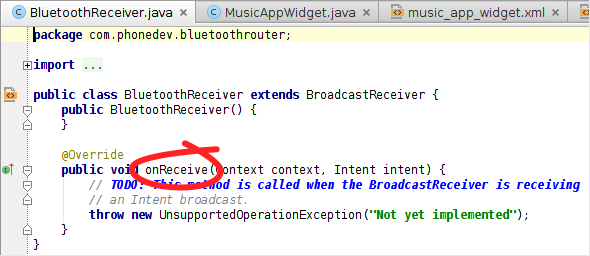 |
| Code created by Android Studio's Broadcast Receiver wizard |
The circled method, onReceive(), will be called whenever we get one of the Bluetooth Intents.
Later in the post, we'll add code to onReceive() to process these intents.
Now, we'll turn to the manifest, which needs to be updated to let Android know we want to receive broadcast intents, where they should be delivered, and which ones we want to receive.
Step 2. Tell Android we want to receive Bluetooth broadcast intents
Our BroadcastReceiver will not receive Bluetooth broadcast intents until we tell Android, in
AndroidManifest.xml, three things:
a) that we want permission to receive these intents (via a
<uses-permission> element)
b) where they should be delivered (via a
<receiver> element)
c) which ones we want (via
<intent-filter> elements)
Here's how we do it.
a. Request permission to receive Bluetooth intents
We need to
request permission to receive Bluetooth's broadcast intents. We can do this by adding the following line (a
<uses-permission> element) to
AndroidManifest.xml, within the <manifest> element and outside of the <application> element.
<uses-permission android:name="android.permission.BLUETOOTH" />
b. Tell Android where to deliver them (our BroadcastReceiver)
When we created the BroadcastReceiver, Android Studio did us the favor of adding a
<receiver> element to
AndroidManifest.xml which declares our new broadcast receiver:
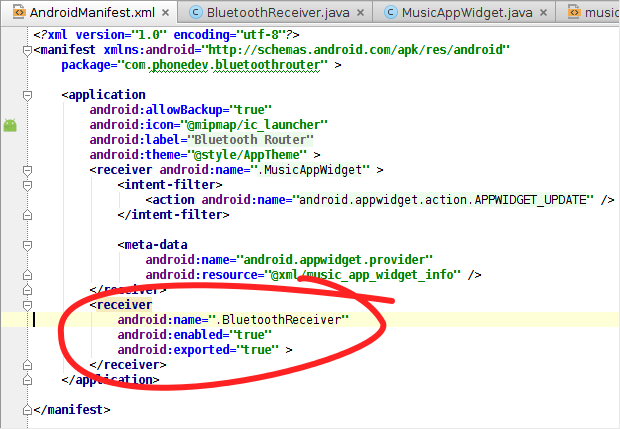 |
| BroadcastReceiver entry in AndroidManifest.xml, added by Android Studio. We still next a uses-permission and intent-filter elements though. |
c. Declare which broadcast intents we want to receive
If you take a look at the
<intent-filter> section of the
AndroidManifest.xml file from the
Bluetooth Intent Logger project, which listens for documented Bluetooth broadcast intents and logs them, you'll see over 20 Bluetooth intent actions that you could register for.
Consider building and installing
Bluetooth Intent Logger on your Android device. It will let you see first-hand the Bluetooth events that are generated when you play with Bluetooth by writing them to logcat as they occur, and give you a better idea of what you can get via broadcast intents. I wrote it to figure out what intents I should be receiving when my code isn't working as expected. The
source is available on Github.
For our Bluetooth Home Screen Widget app (your needs may differ), we're interested some intents that tell us about state changes in the Bluetooth system:
- android.bluetooth.adapter.action.STATE_CHANGED tells us when Bluetooth is turning on or off.
- android.bluetooth.a2dp.profile.action.CONNECTION_STATE_CHANGED tells us when a device has gaining or losing its status as the media audio device.
- android.bluetooth.device.action.BOND_STATE_CHANGED tells us when a device has paired or unpaired.
The resulting AndroidManifest.xml
The parts discussed above, that are necessary for receiving certain Bluetooth broadcast intents, are highlighted.
<?xml version="1.0" encoding="utf-8"?>
<manifest xmlns:android="http://schemas.android.com/apk/res/android"
    package="com.phonedev.bluetoothrouter" >
    <uses-permission android:name="android.permission.BLUETOOTH" />
    <application
        android:allowBackup="true"
        android:icon="@mipmap/ic_launcher"
        android:label="@string/app_name"
        android:theme="@style/AppTheme" >
        <receiver android:name=".MusicAppWidget" >
            <intent-filter>
                <action android:name="android.appwidget.action.APPWIDGET_UPDATE" />
            </intent-filter>

            <meta-data
                android:name="android.appwidget.provider"
                android:resource="@xml/music_app_widget_info" />
        </receiver>
        <receiver
            android:name=".BluetoothReceiver"
            android:enabled="true"
            android:exported="true" >
            <intent-filter>
                <action android:name="android.bluetooth.adapter.action.STATE_CHANGED" />
                <action android:name="android.bluetooth.device.action.BOND_STATE_CHANGED" />
                <action android:name="android.bluetooth.a2dp.profile.action.CONNECTION_STATE_CHANGED" />
            </intent-filter>
        </receiver>
    </application>
</manifest>
Step 3. Process incoming intents in the BroadcastReceiver's onReceive()
Finally, we'll add code to
onReceive() to handle the incoming intents. We're essentially receiving messages from Bluetooth here, and some of them will trigger actions in our code. For now, we'll delegate those actions to other methods that we'll fill in later.
With a few log messages, you can verify that you are receiving the intents by exercising Bluetooth and watching what appears using
adb logcat.
To reduce the log noise, filter out all but the Bluetooth log messages using (from a shell)
$ adb logat -s BluetoothReceiver
where
BluetoothReceiver is the tag provided as the first argument of the
Log.d() calls, below.
package com.phonedev.bluetoothrouter;

import android.bluetooth.BluetoothAdapter;
import android.bluetooth.BluetoothDevice;
import android.bluetooth.BluetoothProfile;
import android.content.BroadcastReceiver;
import android.content.Context;
import android.content.Intent;
import android.os.Bundle;
import android.util.Log;

public class BluetoothReceiver extends BroadcastReceiver {
    public BluetoothReceiver() {
    }

    private static final String TAG = "BluetoothReceiver";    // a tag for logging
    private static final int FAIL = -1;                       // default if extra key not found

    @Override
    /**
     * Receives certain Bluetooth broadcast intents.
     */
    public void onReceive(Context context, Intent intent) {
        String action = intent.getAction();            // Get intent's action string
        Bundle extras = intent.getExtras();            // Get all the Intent's extras
        if (extras == null) return;                    // All intents of interest have extras.

        switch (action) {
            case "android.bluetooth.adapter.action.STATE_CHANGED": {
                bluetoothStateChanged(extras.getInt("android.bluetooth.adapter.extra.STATE", FAIL));
                break;
            }
            case "android.bluetooth.a2dp.profile.action.CONNECTION_STATE_CHANGED": {
                a2dpStateChanged(
                        extras.getInt("android.bluetooth.profile.extra.STATE", FAIL),
                        (BluetoothDevice) extras.get("android.bluetooth.device.extra.DEVICE"));
                break;
            }
            case "android.bluetooth.device.action.BOND_STATE_CHANGED": {
                bondStateChanged(
                        extras.getInt("android.bluetooth.device.extra.BOND_STATE", FAIL),
                        (BluetoothDevice) extras.get("android.bluetooth.device.extra.DEVICE"));
                break;
            }
        }
    }

    /**
     * Handles changes in widget operation when Bluetooth state changes.
     * @param state one of the BluetoothAdapter on/off and transitioning states
     */
    private void bluetoothStateChanged(int state) {
        switch (state) {
            case BluetoothAdapter.STATE_OFF:
            case BluetoothAdapter.STATE_TURNING_ON:
            case BluetoothAdapter.STATE_ON:
            case BluetoothAdapter.STATE_TURNING_OFF:
                // TODO: trigger changes in how widget handles clicks and displays devices
                Log.d(TAG, "Bluetooth adapter state changed to: " + state);
        }
    }

    /**
     * Handles changes in widget operation when a device's A2DP connection state changes
     * @param device the BluetoothDevice whose A2DP connection state has changed
     * @param state the new state, one of the BluetoothProfile connection and transitioning states
     */
    private void a2dpStateChanged(int state, BluetoothDevice device) {
        switch (state) {
            case BluetoothProfile.STATE_DISCONNECTED:
            case BluetoothProfile.STATE_CONNECTING:
            case BluetoothProfile.STATE_CONNECTED:
            case BluetoothProfile.STATE_DISCONNECTING:
                // TODO: trigger changes in how widget handles clicks and displays this device
                Log.d(TAG, "Bluetooth A2DP state changed to " + state + " for " + device.getName());
        }
    }

    /**
     * Handles changes in widget operation when a device's bond state changes
     * @param device the BluetoothDevice whose bond state has changed
     * @param state the new state, one of the BluetoothDevice BOND and transitioning states
     */
    private void bondStateChanged(int state, BluetoothDevice device) {
        switch (state) {
            case BluetoothDevice.BOND_NONE:
            case BluetoothDevice.BOND_BONDING:
            case BluetoothDevice.BOND_BONDED:
                // TODO: trigger changes in how widget handles clicks and displays this device
                Log.d(TAG, "Bluetooth bond state changed to " + state + " for " + device.getName());
        }
    }
}


