
Monday, May 28, 2018
Modified grid charger mock-up
The grid charger mock-up modified, to accommodate the cable to the front panel, and to add a circuit board for mounting the controller.

Sunday, May 27, 2018
Self-driving car mock-up, passenger perspective

...or, having some fun while replacing the air conditioning evaporator.
Saturday, May 26, 2018
Yet another Honda Insight grid charger build
These are my own build notes for a grid charger design by Mike Dabrowski. If you are looking to build one for yourself, check out his site at 99mpg.com, or visit insightcentral.net. I am building mine according to this block diagram: http://99mpg.com/Data/resources/downloads/gridchargerstuff/basicgridchargerv1.pdf These are my build notes.
I am building mine into an old cable TV set top box. Here's the main board from the box:

I decided to mount the power supplies on the box's main circuit board so that I can wire things easily and then drop the whole thing into the chassis. That meant unsoldering some components and melting off the rest with a heat gun:
 |
| I had to unsolder these through-hole components. They will go into my go-kit. |
 |
| These parts came off with the heat gun. I eventually discovered that some of the through-hole parts could be removed this way. There are many itty bitty surface mount parts mixed in there. |
I decided to see if I could reuse the power supply in the set top box. It has many outputs, but I'm only interested in +5V. Sadly, it had no +12V output to drive the Insight's cooling fans, and I was not inclined to change the voltage of one of the other outputs.
 |
| This circuit was actually pretty easy to follow. |
It needed a load across the 3.4V output and a 150 ohm and 100 ohm power resistor in parallel did the trick. There is no reason for them being different values except that they were the first two resistors I found in the junk box.
 |
| Don't mount resistors like this. They will break off, short out and cause fires. |
A mock-up of the power supplies as they will be mounted. It remains to be seen if a cooling fan will be needed.

Saturday, April 22, 2017
Samsung Portable SSD T3 not recognized in some Linux distros
(for future reference)
My Samsung Portable SSD T3 USB 3.0 external drive mounts fine in many operating systems but not in all Linux operating systems.
When the drive is attached through a USB 2 hub, it is recognized and mounts as a normal usb storage device. However, using USB 3, uas (USB Attached SCSI) tries to handle the drive, and fails with errors. dmesg reports the following:
Others have encounted a similar problem, including:
https://bugs.launchpad.net/ubuntu/+source/linux/+bug/1584557
https://bbs.archlinux.org/viewtopic.php?id=204256
https://unix.stackexchange.com/questions/332390/trying-read-a-sata-usb-3-0-kali-linux-light
To address this, first I unplugged the USB drive. Then I created a file named uas-quirks.conf in /etc/modprobe.d. In this file I placed these lines:
The quirks parameter refers to the USB vendor and product ID, seen in the dmesg output.
Then I removed the uas and usb-storage modules:
Then I reinserted the drive. dmesg shows the successful recognition and mounting of the drive:
This is lost after a reboot, though removing the uab and usb-storage modules again (via the rmmod command, above) and reinserting the drive fixes this.
To make this stick through a reboot, the initial ramdisk must be regenerated. This is mentioned for Arch linux in post 12, here: https://bbs.archlinux.org/viewtopic.php?id=183190. For Debian-based distros, we must use
as described in https://unix.stackexchange.com/questions/268903/what-is-the-equivalent-of-mkinitcpio-conf-on-debian
Reboot, and the drive should become available at boot.
My Samsung Portable SSD T3 USB 3.0 external drive mounts fine in many operating systems but not in all Linux operating systems.
When the drive is attached through a USB 2 hub, it is recognized and mounts as a normal usb storage device. However, using USB 3, uas (USB Attached SCSI) tries to handle the drive, and fails with errors. dmesg reports the following:
[   79.365649] usb 3-2: USB disconnect, device number 3
[   95.986879] usb 3-2: new SuperSpeed USB device number 5 using xhci_hcd
[   96.008915] usb 3-2: New USB device found, idVendor=04e8, idProduct=61f3
[   96.008917] usb 3-2: New USB device strings: Mfr=2, Product=3, SerialNumber=1
[   96.008918] usb 3-2: Product: Portable SSD T3
[   96.008918] usb 3-2: Manufacturer: Samsung
[   96.008919] usb 3-2: SerialNumber: [REDACTED]
[   96.024373] scsi host3: uas
[   96.034588] usb 3-2: stat urb: status -32
[   96.034633] scsi 3:0:0:0: tag#0 data cmplt err -32 uas-tag 1 inflight: CMD
[   96.034636] scsi 3:0:0:0: tag#0 CDB: Inquiry 12 00 00 00 24 00
[  116.976075] scsi 3:0:0:0: tag#0 uas_eh_abort_handler 0 uas-tag 1 inflight: CMD
[  116.976082] scsi 3:0:0:0: tag#0 CDB: Inquiry 12 00 00 00 24 00
[  116.976099] scsi host3: uas_eh_bus_reset_handler start
[  117.104269] usb 3-2: reset SuperSpeed USB device number 5 using xhci_hcd
[  117.142580] scsi host3: uas_eh_bus_reset_handler success
[  117.144741] scsi 3:0:0:0: tag#0 uas_eh_abort_handler 0 uas-tag 1 inflight: CMD
[  117.144748] scsi 3:0:0:0: tag#0 CDB: Test Unit Ready 00 00 00 00 00 00
[  117.144753] scsi host3: uas_eh_bus_reset_handler start
[  117.381185] usb 3-2: reset SuperSpeed USB device number 5 using xhci_hcd
[  117.419021] scsi host3: uas_eh_bus_reset_handler success
[  117.419032] scsi 3:0:0:0: Device offlined - not ready after error recovery
Others have encounted a similar problem, including:
https://bugs.launchpad.net/ubuntu/+source/linux/+bug/1584557
https://bbs.archlinux.org/viewtopic.php?id=204256
https://unix.stackexchange.com/questions/332390/trying-read-a-sata-usb-3-0-kali-linux-light
To address this, first I unplugged the USB drive. Then I created a file named uas-quirks.conf in /etc/modprobe.d. In this file I placed these lines:
blacklist uas
usb-storage quirks=04e8:061f3:u
The quirks parameter refers to the USB vendor and product ID, seen in the dmesg output.
Then I removed the uas and usb-storage modules:
# rmmod uas usb-storageThen I reinserted the drive. dmesg shows the successful recognition and mounting of the drive:
[  440.997304] usb 3-2: USB disconnect, device number 7
[  444.483537] usb 3-2: new SuperSpeed USB device number 8 using xhci_hcd
[  444.508678] usb 3-2: New USB device found, idVendor=04e8, idProduct=61f3
[  444.508683] usb 3-2: New USB device strings: Mfr=2, Product=3, SerialNumber=1
[  444.508686] usb 3-2: Product: Portable SSD T3
[  444.508688] usb 3-2: Manufacturer: Samsung
[  444.508690] usb 3-2: SerialNumber: [REDACTED]
[  444.548376] usb 3-2: UAS is blacklisted for this device, using usb-storage instead
[  444.548379] usb-storage 3-2:1.0: USB Mass Storage device detected
[  444.552347] usb-storage 3-2:1.0: Quirks match for vid 04e8 pid 61f3: 800000
[  444.552392] scsi host3: usb-storage 3-2:1.0
[  444.552589] usbcore: registered new interface driver usb-storage
[  445.575738] scsi 3:0:0:0: Direct-Access     Samsung  Portable SSD T3  0    PQ: 0 ANSI: 6
[  445.578869] sd 3:0:0:0: Attached scsi generic sg5 type 0
[  445.583770] sd 3:0:0:0: [sde] 488397168 512-byte logical blocks: (250 GB/233 GiB)
[  445.586010] sd 3:0:0:0: [sde] Write Protect is off
[  445.586019] sd 3:0:0:0: [sde] Mode Sense: 43 00 00 00
[  445.591757] sd 3:0:0:0: [sde] Write cache: enabled, read cache: enabled, doesn't support DPO or FUA
[  445.610612]  sde: sde1
[  445.621442] sd 3:0:0:0: [sde] Attached SCSI disk
[  445.924981] EXT4-fs (sde1): mounted filesystem with ordered data mode. Opts: (null)
This is lost after a reboot, though removing the uab and usb-storage modules again (via the rmmod command, above) and reinserting the drive fixes this.
To make this stick through a reboot, the initial ramdisk must be regenerated. This is mentioned for Arch linux in post 12, here: https://bbs.archlinux.org/viewtopic.php?id=183190. For Debian-based distros, we must use
# update-initramfs -uas described in https://unix.stackexchange.com/questions/268903/what-is-the-equivalent-of-mkinitcpio-conf-on-debian
Reboot, and the drive should become available at boot.
Saturday, February 27, 2016
Connector Archaeology
Yesterday a local band was having problems with the DC power jack on their main keyboard, a Hammond XK-1c, so I offered to fix it.


It is very odd to leave a bar with a keyboard from the band you just watched, and very uncomfortable to see it in pieces when you know they'll need it the next night.
Back at the makerspace, I extracted broken plastics which jammed the jack and prevented it from powering up. But did I have a replacement jack to fit this odd kind of DC plug?
 |
| An EIAJ-04 plug. I was looking for the jack. |
The only harvestable jack did not look like it could handle the keyboard's current requirements. I needed to order one but had no idea what type of jack this was. The parts search pages for Digikey and Mouser don't have a column for "looks kind of like a regular DC connector, but isn't".
Looking around the makerspace, I realized that HP, Dell and Sony laptops all use a similar style connector. With that clue, I finally discovered that this is an EIAJ connector. They come in five sizes, so that you can't accidentally plug a higher voltage adapter into a lower voltage device.
The Sony laptop plug, needing 19 volts, appears to be an EIAJ-05 connector, while the Hammond, needing 12 volts, has the same measurements as an EIAJ-04. (The HP's connector looks just like the Sony's but is a little larger. Perhaps an EIAJ knockoff?)
It took a bit more searching to find that CUI and Hosiden make these jacks. Both Mouser and Digikey sell the CUI version, part number PJ-019.
As far as the band was concerned, I got the keyboard returned to them usable for their next show. In a few days the new connector will arrive, and it will be good as new!
Monday, April 27, 2015
Flask user authentication using SecureDB's user management service
A week ago, our hackathon team won some nice hover drones for using SecureDB's user management service as part of our app. Since their service completely eliminated the need to create and manage a secure user database (which is going to be very helpful for future rapid prototyped projects) I thought I'd document how it is done in Flask.
Once you've signed up and followed their Quick Start, you'll have created a user and can test the authentication REST API.
I've written a small Python module that shows how it is done. It's extremely simple. The only trick is that you have to set the Content-Type header the request to application/json. The code below is much longer than it need be, due to the explanatory comments:
----------------------
-----------------------
I've wrapped a Flask server around this to make it easy to enter a username/password and see the response. The source code is posted on Github.
The response message from SecureDB is a JSON object that provides a useful message and, if authentication was successful, the user ID:
Once you've signed up and followed their Quick Start, you'll have created a user and can test the authentication REST API.
I've written a small Python module that shows how it is done. It's extremely simple. The only trick is that you have to set the Content-Type header the request to application/json. The code below is much longer than it need be, due to the explanatory comments:
----------------------
import requests
import json

# Load SecureDB credentials from a separate file (credentials.py):
from credentials import credentials

# Store strings for forming API request URLs here:
base_url = 'http://api.securedb.co/securedbapi/account/'
authenticate_url = '/authenticate'

def authenticate(username, password):
  """Authenticate a user given the username and password.

  Returns the response from the authentication request. Since the
  authentication request is performed using Python Requests, the
  response format follows that of a response returned by
  requests.post(). See the following documentation for details:

  http://docs.python-requests.org/en/latest/user/quickstart/#response-content

  If securedb.co provided a response, response.content will contain JSON
  from SecureDB with information like a response string ("message") and, if
  authenticated, user ID ("data"). See the SecureDB documentation for the
  Authenticate API call:

  https://api.securedb.co/swagger/index.html
  """
  # Form the URL by combining base url, cust id, dir id, and auth path:
  url = ( base_url +
          credentials['customer_id'] + '/' +
          credentials['directory_id'] +
          authenticate_url )

  # Specify application/json as the content type in the header:
  headers = {'Content-Type':'application/json'}

  # Provide the API key and Secret key as user/pass for API authentication
  auth = ( credentials['api_key'],
           credentials['secret_key'] )

  # Create the POST data containing the username and password passed to us:
  data = ( '{"userName": "' + username + '","password":"' + password + '"}' )

  # Make the request:
  return requests.post(url, data=data, auth=auth, headers=headers)
-----------------------
I've wrapped a Flask server around this to make it easy to enter a username/password and see the response. The source code is posted on Github.
 |
| A form provided for easy entering of username and password |
 |
| Successful authentication. Note that the "data" key has the user ID as its value. |
 |
| Failed authentication. The username entered was not one stored in the user database. |
 |
| Failed authentication. The password was entered incorrectly. |
Friday, April 10, 2015
How to receive Bluetooth broadcast intents
This post about receiving Bluetooth broadcast intents, written for a series about creating a Bluetooth home screen widget, seemed worthwhile standalone, so here it is, in three steps.
If you take a look at the <intent-filter> section of the AndroidManifest.xml file from the Bluetooth Intent Logger project, which listens for documented Bluetooth broadcast intents and logs them, you'll see over 20 Bluetooth intent actions that you could register for.
For our Bluetooth Home Screen Widget app (your needs may differ), we're interested some intents that tell us about state changes in the Bluetooth system:
The parts discussed above, that are necessary for receiving certain Bluetooth broadcast intents, are highlighted.
Finally, we'll add code to onReceive() to handle the incoming intents. We're essentially receiving messages from Bluetooth here, and some of them will trigger actions in our code. For now, we'll delegate those actions to other methods that we'll fill in later.
With a few log messages, you can verify that you are receiving the intents by exercising Bluetooth and watching what appears using adb logcat.
To reduce the log noise, filter out all but the Bluetooth log messages using (from a shell)
$ adb logat -s BluetoothReceiver
where BluetoothReceiver is the tag provided as the first argument of the Log.d() calls, below.
Step 1. Create a BroadcastReceiver to receive Bluetooth events
Create a class that extends BroadcastReceiver. Android Studio has a wizard that will do this for you. Right-click on the path where you want the file created in the Project pane. Select New > Other > Broadcast Receiver. In the wizard, name the class (here named BluetoothReceiver for our widget project) and Android Studio will create this for you:

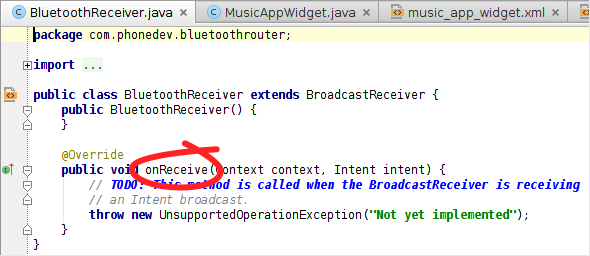 |
| Code created by Android Studio's Broadcast Receiver wizard |
The circled method, onReceive(), will be called whenever we get one of the Bluetooth Intents.
Later in the post, we'll add code to onReceive() to process these intents.
Now, we'll turn to the manifest, which needs to be updated to let Android know we want to receive broadcast intents, where they should be delivered, and which ones we want to receive.
Later in the post, we'll add code to onReceive() to process these intents.
Now, we'll turn to the manifest, which needs to be updated to let Android know we want to receive broadcast intents, where they should be delivered, and which ones we want to receive.
Step 2. Tell Android we want to receive Bluetooth broadcast intents
Our BroadcastReceiver will not receive Bluetooth broadcast intents until we tell Android, in AndroidManifest.xml, three things:
a) that we want permission to receive these intents (via a <uses-permission> element)
b) where they should be delivered (via a <receiver> element)
c) which ones we want (via <intent-filter> elements)
Here's how we do it.
When we created the BroadcastReceiver, Android Studio did us the favor of adding a <receiver> element to AndroidManifest.xml which declares our new broadcast receiver:
b) where they should be delivered (via a <receiver> element)
c) which ones we want (via <intent-filter> elements)
Here's how we do it.
a. Request permission to receive Bluetooth intents
We need to request permission to receive Bluetooth's broadcast intents. We can do this by adding the following line (a <uses-permission> element) to AndroidManifest.xml, within the <manifest> element and outside of the <application> element.
<uses-permission android:name="android.permission.BLUETOOTH" />
b. Tell Android where to deliver them (our BroadcastReceiver)
When we created the BroadcastReceiver, Android Studio did us the favor of adding a <receiver> element to AndroidManifest.xml which declares our new broadcast receiver:
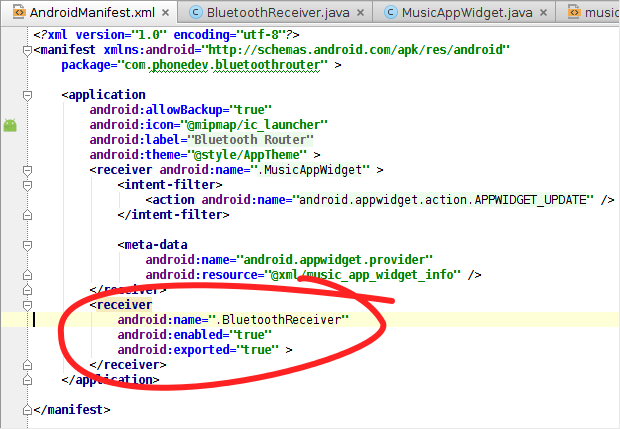 |
| BroadcastReceiver entry in AndroidManifest.xml, added by Android Studio. We still next a uses-permission and intent-filter elements though. |
c. Declare which broadcast intents we want to receive
If you take a look at the <intent-filter> section of the AndroidManifest.xml file from the Bluetooth Intent Logger project, which listens for documented Bluetooth broadcast intents and logs them, you'll see over 20 Bluetooth intent actions that you could register for.
Consider building and installing Bluetooth Intent Logger on your Android device. It will let you see first-hand the Bluetooth events that are generated when you play with Bluetooth by writing them to logcat as they occur, and give you a better idea of what you can get via broadcast intents. I wrote it to figure out what intents I should be receiving when my code isn't working as expected. The source is available on Github.
For our Bluetooth Home Screen Widget app (your needs may differ), we're interested some intents that tell us about state changes in the Bluetooth system:
- android.bluetooth.adapter.action.STATE_CHANGED tells us when Bluetooth is turning on or off.
- android.bluetooth.a2dp.profile.action.CONNECTION_STATE_CHANGED tells us when a device has gaining or losing its status as the media audio device.
- android.bluetooth.device.action.BOND_STATE_CHANGED tells us when a device has paired or unpaired.
The resulting AndroidManifest.xml
The parts discussed above, that are necessary for receiving certain Bluetooth broadcast intents, are highlighted.
<?xml version="1.0" encoding="utf-8"?>
<manifest xmlns:android="http://schemas.android.com/apk/res/android"
    package="com.phonedev.bluetoothrouter" >
    <uses-permission android:name="android.permission.BLUETOOTH" />
    <application
        android:allowBackup="true"
        android:icon="@mipmap/ic_launcher"
        android:label="@string/app_name"
        android:theme="@style/AppTheme" >
        <receiver android:name=".MusicAppWidget" >
            <intent-filter>
                <action android:name="android.appwidget.action.APPWIDGET_UPDATE" />
            </intent-filter>

            <meta-data
                android:name="android.appwidget.provider"
                android:resource="@xml/music_app_widget_info" />
        </receiver>
        <receiver
            android:name=".BluetoothReceiver"
            android:enabled="true"
            android:exported="true" >
            <intent-filter>
                <action android:name="android.bluetooth.adapter.action.STATE_CHANGED" />
                <action android:name="android.bluetooth.device.action.BOND_STATE_CHANGED" />
                <action android:name="android.bluetooth.a2dp.profile.action.CONNECTION_STATE_CHANGED" />
            </intent-filter>
        </receiver>
    </application>
</manifest>
Step 3. Process incoming intents in the BroadcastReceiver's onReceive()
Finally, we'll add code to onReceive() to handle the incoming intents. We're essentially receiving messages from Bluetooth here, and some of them will trigger actions in our code. For now, we'll delegate those actions to other methods that we'll fill in later.
With a few log messages, you can verify that you are receiving the intents by exercising Bluetooth and watching what appears using adb logcat.
To reduce the log noise, filter out all but the Bluetooth log messages using (from a shell)
$ adb logat -s BluetoothReceiver
where BluetoothReceiver is the tag provided as the first argument of the Log.d() calls, below.
package com.phonedev.bluetoothrouter;

import android.bluetooth.BluetoothAdapter;
import android.bluetooth.BluetoothDevice;
import android.bluetooth.BluetoothProfile;
import android.content.BroadcastReceiver;
import android.content.Context;
import android.content.Intent;
import android.os.Bundle;
import android.util.Log;

public class BluetoothReceiver extends BroadcastReceiver {
    public BluetoothReceiver() {
    }

    private static final String TAG = "BluetoothReceiver";    // a tag for logging
    private static final int FAIL = -1;                       // default if extra key not found

    @Override
    /**
     * Receives certain Bluetooth broadcast intents.
     */
    public void onReceive(Context context, Intent intent) {
        String action = intent.getAction();            // Get intent's action string
        Bundle extras = intent.getExtras();            // Get all the Intent's extras
        if (extras == null) return;                    // All intents of interest have extras.

        switch (action) {
            case "android.bluetooth.adapter.action.STATE_CHANGED": {
                bluetoothStateChanged(extras.getInt("android.bluetooth.adapter.extra.STATE", FAIL));
                break;
            }
            case "android.bluetooth.a2dp.profile.action.CONNECTION_STATE_CHANGED": {
                a2dpStateChanged(
                        extras.getInt("android.bluetooth.profile.extra.STATE", FAIL),
                        (BluetoothDevice) extras.get("android.bluetooth.device.extra.DEVICE"));
                break;
            }
            case "android.bluetooth.device.action.BOND_STATE_CHANGED": {
                bondStateChanged(
                        extras.getInt("android.bluetooth.device.extra.BOND_STATE", FAIL),
                        (BluetoothDevice) extras.get("android.bluetooth.device.extra.DEVICE"));
                break;
            }
        }
    }

    /**
     * Handles changes in widget operation when Bluetooth state changes.
     * @param state one of the BluetoothAdapter on/off and transitioning states
     */
    private void bluetoothStateChanged(int state) {
        switch (state) {
            case BluetoothAdapter.STATE_OFF:
            case BluetoothAdapter.STATE_TURNING_ON:
            case BluetoothAdapter.STATE_ON:
            case BluetoothAdapter.STATE_TURNING_OFF:
                // TODO: trigger changes in how widget handles clicks and displays devices
                Log.d(TAG, "Bluetooth adapter state changed to: " + state);
        }
    }

    /**
     * Handles changes in widget operation when a device's A2DP connection state changes
     * @param device the BluetoothDevice whose A2DP connection state has changed
     * @param state the new state, one of the BluetoothProfile connection and transitioning states
     */
    private void a2dpStateChanged(int state, BluetoothDevice device) {
        switch (state) {
            case BluetoothProfile.STATE_DISCONNECTED:
            case BluetoothProfile.STATE_CONNECTING:
            case BluetoothProfile.STATE_CONNECTED:
            case BluetoothProfile.STATE_DISCONNECTING:
                // TODO: trigger changes in how widget handles clicks and displays this device
                Log.d(TAG, "Bluetooth A2DP state changed to " + state + " for " + device.getName());
        }
    }

    /**
     * Handles changes in widget operation when a device's bond state changes
     * @param device the BluetoothDevice whose bond state has changed
     * @param state the new state, one of the BluetoothDevice BOND and transitioning states
     */
    private void bondStateChanged(int state, BluetoothDevice device) {
        switch (state) {
            case BluetoothDevice.BOND_NONE:
            case BluetoothDevice.BOND_BONDING:
            case BluetoothDevice.BOND_BONDED:
                // TODO: trigger changes in how widget handles clicks and displays this device
                Log.d(TAG, "Bluetooth bond state changed to " + state + " for " + device.getName());
        }
    }
}
Subscribe to:
Posts (Atom)