Monday, April 27, 2015

Flask user authentication using SecureDB's user management service

A week ago, our hackathon team won some nice hover drones for using SecureDB's user management service as part of our app. Since their service completely eliminated the need to create and manage a secure user database (which is going to be very helpful for future rapid prototyped projects) I thought I'd document how it is done in Flask.

Once you've signed up and followed their Quick Start, you'll have created a user and can test the authentication REST API.

I've written a small Python module that shows how it is done. It's extremely simple. The only trick is that you have to set the Content-Type header the request to application/json. The code below is much longer than it need be, due to the explanatory comments:

----------------------

import requests
import json

# Load SecureDB credentials from a separate file (credentials.py):
from credentials import credentials

# Store strings for forming API request URLs here:
base_url = 'http://api.securedb.co/securedbapi/account/'
authenticate_url = '/authenticate'

def authenticate(username, password):
  """Authenticate a user given the username and password.

  Returns the response from the authentication request. Since the
  authentication request is performed using Python Requests, the
  response format follows that of a response returned by
  requests.post(). See the following documentation for details:

  http://docs.python-requests.org/en/latest/user/quickstart/#response-content

  If securedb.co provided a response, response.content will contain JSON
  from SecureDB with information like a response string ("message") and, if
  authenticated, user ID ("data"). See the SecureDB documentation for the 
  Authenticate API call:

  https://api.securedb.co/swagger/index.html
  """
  # Form the URL by combining base url, cust id, dir id, and auth path:
  url = ( base_url +
          credentials['customer_id'] + '/' +
          credentials['directory_id'] +
          authenticate_url )

  # Specify application/json as the content type in the header:
  headers = {'Content-Type':'application/json'}

  # Provide the API key and Secret key as user/pass for API authentication
  auth = ( credentials['api_key'],
           credentials['secret_key'] ) 

  # Create the POST data containing the username and password passed to us:
  data = ( '{"userName": "' + username + '","password":"' + password + '"}' )

  # Make the request:
  return requests.post(url, data=data, auth=auth, headers=headers)

-----------------------

I've wrapped a Flask server around this to make it easy to enter a username/password and see the response. The source code is posted on Github.

A form provided for easy entering of username and password
The response message from SecureDB is a JSON object that provides a useful message and, if authentication was successful, the user ID:

Successful authentication. Note that the "data" key has the user ID as its value.

Failed authentication. The username entered was not one stored in the user database.

Failed authentication. The password was entered incorrectly.


Friday, April 10, 2015

How to receive Bluetooth broadcast intents

This post about receiving Bluetooth broadcast intents, written for a series about creating a Bluetooth home screen widget, seemed worthwhile standalone, so here it is, in three steps.

Step 1. Create a BroadcastReceiver to receive Bluetooth events


Create a class that extends BroadcastReceiver. Android Studio has a wizard that will do this for you. Right-click on the path where you want the file created in the Project pane. Select New > Other > Broadcast Receiver. In the wizard, name the class (here named BluetoothReceiver for our widget project) and Android Studio will create this for you:
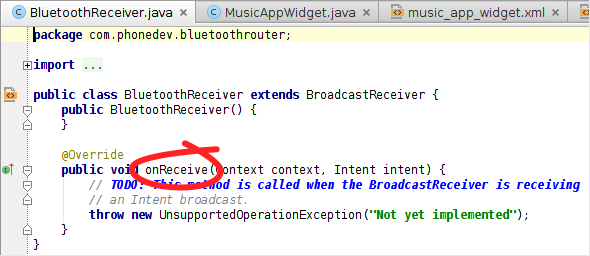

Code created by Android Studio's Broadcast Receiver wizard

The circled method, onReceive(), will be called whenever we get one of the Bluetooth Intents.

Later in the post, we'll add code to onReceive() to process these intents.

Now, we'll turn to the manifest, which needs to be updated to let Android know we want to receive broadcast intents, where they should be delivered, and which ones we want to receive.

Step 2. Tell Android we want to receive Bluetooth broadcast intents


Our BroadcastReceiver will not receive Bluetooth broadcast intents until we tell Android, in AndroidManifest.xml, three things:

  a) that we want permission to receive these intents (via a <uses-permission> element)
  b) where they should be delivered (via a <receiver> element)
  c) which ones we want (via <intent-filter> elements)

Here's how we do it.

a. Request permission to receive Bluetooth intents


We need to request permission to receive Bluetooth's broadcast intents. We can do this by adding the following line (a <uses-permission> element) to AndroidManifest.xml, within the <manifest> element and outside of the <application> element.

<uses-permission android:name="android.permission.BLUETOOTH" />

b. Tell Android where to deliver them (our BroadcastReceiver)


When we created the BroadcastReceiver, Android Studio did us the favor of adding a <receiver> element to AndroidManifest.xml which declares our new broadcast receiver:
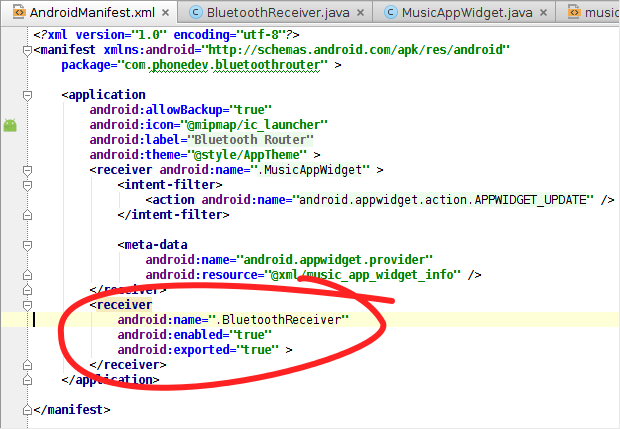
BroadcastReceiver entry in AndroidManifest.xml, added by Android Studio. We still next a uses-permission and intent-filter elements though.

c. Declare which broadcast intents we want to receive


If you take a look at the <intent-filter> section of the AndroidManifest.xml file from the Bluetooth Intent Logger project, which listens for documented Bluetooth broadcast intents and logs them, you'll see over 20 Bluetooth intent actions that you could register for.

Consider building and installing Bluetooth Intent Logger on your Android device. It will let you see first-hand the Bluetooth events that are generated when you play with Bluetooth by writing them to logcat as they occur, and give you a better idea of what you can get via broadcast intents. I wrote it to figure out what intents I should be receiving when my code isn't working as expected. The source is available on Github.

For our Bluetooth Home Screen Widget app (your needs may differ), we're interested some intents that tell us about state changes in the Bluetooth system: 

  • android.bluetooth.adapter.action.STATE_CHANGED tells us when Bluetooth is turning on or off.
  • android.bluetooth.a2dp.profile.action.CONNECTION_STATE_CHANGED tells us when a device has gaining or losing its status as the media audio device.
  • android.bluetooth.device.action.BOND_STATE_CHANGED tells us when a device has paired or unpaired.

The resulting AndroidManifest.xml


The parts discussed above, that are necessary for receiving certain Bluetooth broadcast intents, are highlighted.

<?xml version="1.0" encoding="utf-8"?>
<manifest xmlns:android="http://schemas.android.com/apk/res/android"
    package="com.phonedev.bluetoothrouter" >
    <uses-permission android:name="android.permission.BLUETOOTH" />
    <application
        android:allowBackup="true"
        android:icon="@mipmap/ic_launcher"
        android:label="@string/app_name"
        android:theme="@style/AppTheme" >
        <receiver android:name=".MusicAppWidget" >
            <intent-filter>
                <action android:name="android.appwidget.action.APPWIDGET_UPDATE" />
            </intent-filter>

            <meta-data
                android:name="android.appwidget.provider"
                android:resource="@xml/music_app_widget_info" />
        </receiver>
        <receiver
            android:name=".BluetoothReceiver"
            android:enabled="true"
            android:exported="true" >
            <intent-filter>
                <action android:name="android.bluetooth.adapter.action.STATE_CHANGED" />
                <action android:name="android.bluetooth.device.action.BOND_STATE_CHANGED" />
                <action android:name="android.bluetooth.a2dp.profile.action.CONNECTION_STATE_CHANGED" />
            </intent-filter>
        </receiver>
    </application>
</manifest>

Step 3. Process incoming intents in the BroadcastReceiver's onReceive()


Finally, we'll add code to onReceive() to handle the incoming intents. We're essentially receiving messages from Bluetooth here, and some of them will trigger actions in our code. For now, we'll delegate those actions to other methods that we'll fill in later.

With a few log messages, you can verify that you are receiving the intents by exercising Bluetooth and watching what appears using adb logcat.

To reduce the log noise, filter out all but the Bluetooth log messages using (from a shell)

$ adb logat -s BluetoothReceiver

where BluetoothReceiver is the tag provided as the first argument of the Log.d() calls, below.

package com.phonedev.bluetoothrouter;

import android.bluetooth.BluetoothAdapter;
import android.bluetooth.BluetoothDevice;
import android.bluetooth.BluetoothProfile;
import android.content.BroadcastReceiver;
import android.content.Context;
import android.content.Intent;
import android.os.Bundle;
import android.util.Log;

public class BluetoothReceiver extends BroadcastReceiver {
    public BluetoothReceiver() {
    }

    private static final String TAG = "BluetoothReceiver";    // a tag for logging
    private static final int FAIL = -1;                       // default if extra key not found

    @Override
    /**
     * Receives certain Bluetooth broadcast intents.
     */
    public void onReceive(Context context, Intent intent) {
        String action = intent.getAction();            // Get intent's action string
        Bundle extras = intent.getExtras();            // Get all the Intent's extras
        if (extras == null) return;                    // All intents of interest have extras.

        switch (action) {
            case "android.bluetooth.adapter.action.STATE_CHANGED": {
                bluetoothStateChanged(extras.getInt("android.bluetooth.adapter.extra.STATE", FAIL));
                break;
            }
            case "android.bluetooth.a2dp.profile.action.CONNECTION_STATE_CHANGED": {
                a2dpStateChanged(
                        extras.getInt("android.bluetooth.profile.extra.STATE", FAIL),
                        (BluetoothDevice) extras.get("android.bluetooth.device.extra.DEVICE"));
                break;
            }
            case "android.bluetooth.device.action.BOND_STATE_CHANGED": {
                bondStateChanged(
                        extras.getInt("android.bluetooth.device.extra.BOND_STATE", FAIL),
                        (BluetoothDevice) extras.get("android.bluetooth.device.extra.DEVICE"));
                break;
            }
        }
    }

    /**
     * Handles changes in widget operation when Bluetooth state changes.
     * @param state one of the BluetoothAdapter on/off and transitioning states
     */
    private void bluetoothStateChanged(int state) {
        switch (state) {
            case BluetoothAdapter.STATE_OFF:
            case BluetoothAdapter.STATE_TURNING_ON:
            case BluetoothAdapter.STATE_ON:
            case BluetoothAdapter.STATE_TURNING_OFF:
                // TODO: trigger changes in how widget handles clicks and displays devices
                Log.d(TAG, "Bluetooth adapter state changed to: " + state);
        }
    }

    /**
     * Handles changes in widget operation when a device's A2DP connection state changes
     * @param device the BluetoothDevice whose A2DP connection state has changed
     * @param state the new state, one of the BluetoothProfile connection and transitioning states
     */
    private void a2dpStateChanged(int state, BluetoothDevice device) {
        switch (state) {
            case BluetoothProfile.STATE_DISCONNECTED:
            case BluetoothProfile.STATE_CONNECTING:
            case BluetoothProfile.STATE_CONNECTED:
            case BluetoothProfile.STATE_DISCONNECTING:
                // TODO: trigger changes in how widget handles clicks and displays this device
                Log.d(TAG, "Bluetooth A2DP state changed to " + state + " for " + device.getName());
        }
    }

    /**
     * Handles changes in widget operation when a device's bond state changes
     * @param device the BluetoothDevice whose bond state has changed
     * @param state the new state, one of the BluetoothDevice BOND and transitioning states
     */
    private void bondStateChanged(int state, BluetoothDevice device) {
        switch (state) {
            case BluetoothDevice.BOND_NONE:
            case BluetoothDevice.BOND_BONDING:
            case BluetoothDevice.BOND_BONDED:
                // TODO: trigger changes in how widget handles clicks and displays this device
                Log.d(TAG, "Bluetooth bond state changed to " + state + " for " + device.getName());
        }
    }
}

Android Studio code formatter for blogging

Copy on steroids is a JetBrains plugin that can be used to copy code from Android Studio (or any other flavor of IntelliJ) and paste it into a blog post.

I found it much easier to use, and better much better highlighting for cutting and pasting Android code from Android Studio to a blog post. Example:

@Override
/**
 * Receives certain Bluetooth broadcast intents.
 */
public void onReceive(Context context, Intent intent) {
    String action = intent.getAction();            // Get intent's action string
    Bundle extras = intent.getExtras();            // Get all the Intent's extras
    if (extras == null) return;                    // All intents of interest have extras.

    switch (action) {
        case "android.bluetooth.adapter.action.STATE_CHANGED": {
            bluetoothStateChanged(extras.getInt("android.bluetooth.adapter.extra.STATE", FAIL));
            break;
        }
        case "android.bluetooth.a2dp.profile.action.CONNECTION_STATE_CHANGED": {
            a2dpStateChanged(
                    extras.getInt("android.bluetooth.adapter.extra.CONNECTION_STATE", FAIL),
                    (BluetoothDevice) extras.get("android.bluetooth.device.extra.DEVICE"));
            break;
        }
        case "android.bluetooth.device.action.BOND_STATE_CHANGED": {
            bondStateChanged(
                    extras.getInt("android.bluetooth.device.extra.BOND_STATE", FAIL),
                    (BluetoothDevice) extras.get("android.bluetooth.device.extra.DEVICE"));
            break;
        }
    }
}

The default causes long lines to wrap. If you want a scrollbar to appear instead, as above, you have to pop into HTML and add "overflow-x: auto" to the first <div> of the pasted code, and add "display: inline-block" to the first <pre>.

There is source in Github; all it needs is an open source license, and adding a setting that lets you choose scrollbars over line wrapping would be very easy.

Tuesday, March 24, 2015

Mindful selection of constant values (for uniqueness)

(I ran into this issue when trying to grok the Android Bluetooth API, and thought it was worthy of a post.)

Say you have a value and need to know the name of the constant. For example, you are debugging some code, and things would be much more obvious if you could log the name of a state returned by a method getState(), not just its value:

1
2
3
4
5
6
7
8
  // Possible device states
  public static final int STATE_IDLE = 0x00;
  public static final int STATE_STARTING = 0x01;
  public static final int STATE_RUNNING = 0x02;
  ...
  public int getState() {
    return mState;
  }

You could solve this with a lookup table. But if there are many constants, or the documentation is in the code, or new constants may be added later, or there are undocumented manufacturer additions, you can save a lot of code by using reflection to look up the names of the constants at runtime.

With reflection, you would obtain all the constants in the class, look for the constant whose value matches the one you got from getState(), and display the constant's name instead of its value.

But say that this code is also in the same class:

1
2
3
4
5
6
7
  // Possible power settings
  public static final int POWER_OFF = 0x00;
  public static final int POWER_ON = 0x01;
  ...
  public int getPower() {
    return mPower;
  }

While it may make sense to represent power settings with a 0 and 1, the reuse of these values breaks our ability to uniquely discover a constant's name using reflection, because one value now maps to two constants.

One approach to ensure uniqueness is to use a higher order byte to encode the information that the constant represents. In this example, hex 0x0a00 is added to STATE_ constants, and 0x0b00 is added to POWER_ constants:

1
2
3
4
5
6
  public final static int STATE_IDLE     = 0x0a00;
  public final static int STATE_STARTING = 0x0a01;
  public final static int STATE_RUNNING  = 0x0a02;

  public final static int DEVICE_OFF     = 0x0b00;
  public final static int DEVICE_ON      = 0x0b01;

Developers may not encounter the need for reflection in normal coding. But it can come in very handy during testing, or when you encounter a complex system like Bluetooth, and are trying to figure it out. There are going to be times where different constants must have the same value. But many times, values can be unique. Mindful consideration of constant values to permit discovery of their corresponding constant names through reflection may be appreciated by others who will eventually be interacting with your code.

Tuesday, March 17, 2015

Learning how Bluetooth works on Android, by using it

I picked up a really great LG Bluetooth headset at RadioShack during our local store's closeout. But I quickly found what a pain it was to switch between the headset and my car stereo and my home stereo. I decided to write an Android home screen widget to make this super easy (it's still in progress) but in doing that I had to learn how Bluetooth works.

My app requires me to keep on top of the status of each A2DP (media) and headset (phone call handling) device. Do I query the Bluetooth system for status on all of my devices from time to time? Or can I get notified reliably when a device's Bluetooth status changes?

It turns out that Bluetooth can give you updates when things change. And how is via Broadcast Intents.

I decided to write a small app that would receive Broadcast Intents and write them to logcat. This was easy: I created a BroadcastReceiver and advertised my desire to receive a number of Bluetooth-related Broadcast Intents in the app manifest. Then I could exercise the phone - turn Bluetooth on and off, scan for devices, pair, unpair, etc - and see what Bluetooth tells me.

There was one little problem. While the Bluetooth API documentation shows you the names of constants that are sent in the intents as extras, the intents actually contain just the values. So you have to dig through the API documentation or the source to figure out which constant name each value belongs to.

To address this I wrote the app to look up the values and return them. For some of the values I created a lookup table, but for others I used reflection. Reflection, actually, is quite useful, because it returns the names for *any* constant values - even undocumented ones - as long as they exist in the class on the device. It turns out that manufacturers add additional information to the intent, and this is one way you'll discover it. For example, I discovered that Samsung added EXTRA_GEARMANAGER_GEAR to the BluetoothDevice ACTION_FOUND intent that is sent when a device is found during discovery.

So, here's what you attach a Galaxy S4 to your development machine, run $ adb logcat -s BluetoothIntentLogger, go to the phone, run the app, go into the Bluetooth settings, scan for devices, while an LG Viper is advertising its presence:


There are five broadcast intents received. Two from BluetoothAdapter at the start and end signal the beginning and ending of the discovery process. In the middle, the LG Viper is discovered, and we learn a bit about it:
  • It's a PHONE, and a SMART_PHONE to boot (we can use that info for choosing an icon!)
  • It's an LG Viper (in my other app, I'll let the use store a different name.)
  • It's (apparently) not Samsung Gear.
  • It's pretty close by - it has a signal strength of -48 dBm.
  • It doesn't support Bluetooth Low Energy.
In verbose mode, the app will show you the constant values and data types as well.

In playing with this app, I've found that when you turn on Bluetooth, you get a list of all devices that are currently paired to the device. That's perfect for populating my app for the first time. And the receipt of Broadcast Intents when things change will provide a timely trigger for the update of my widget.

Another thing I learned is that since Android 3.1, Broadcast Intents must be associated with a running process unless the sender designates otherwise (see the section on Launch Controls, in the 3.1 API notes.)

I considered displaying the log data in an Activity or send it to a pastebin, but that seems unnecessary, so logcat will remain the output mechanism for now.

Get BluetoothIntentLogger on Github

Thursday, March 12, 2015

Samsung night vision camera's PAL/NTSC and normal/reverse video settings

Warning and disclaimer statement: Opening or modifying a device such as this will void its warranty and can create failure modes that lead to property damage, injury or death. We disclaim any warranties regarding the accuracy or reliability of this information, and will not accept liability for any injuries or damages that may result from the reader's use of this content. 

The placement of one resistor at time of manufacture puts this Samsung SDC-7340BCN into normal video mode, instead of a mirror mode such as that output by a backup camera. As opposed to conventional cameras, backup cameras output a mirror image so that what you see in the image is on the same side as it is on the vehicle. Many vehicle monitors accept composite video, which this camera outputs.
This night vision camera, found on deep discount at RadioShack, produces a clear image in low light.
Based on the resolution and packaging of the image sensor, it seems this particular camera uses a PixelPlus PC1099K image sensor. For a composite video camera, this sensor has a lot of pixels and produces a comparatively sharp image. Searching for "PC1099K" returns hits for many different cameras, which likely are similarly configured. The PC1099K is apparently designed to be used not only as a normal camera but also as a backup camera, and has features that allow the placement of guide lines over the video image.
The horizontal and vertical mirror modes are determined by applying a pull-up or pull-down resistor to certain pins on the image sensor. In this camera, the designers placed pads side by side, so that the placement of a resistor on one side would pull down the pin, and placement on the other would pull it up. This lets the manufacturer select the mirror and PAL/NTSC modes at manufacture simply through the placement and omission of resistors.

During manufacture, one pad is populated and the other is left open.